Computer Forensics: Dos commands
Computer Forensics is the method of investigating electronic devices or
media in order to realize and analyze available, delete, or “hidden”
information that can serve as useful evidence to support claims and defences of
a legal perception and may help when data have been accidentally or
purposefully deleted and lost due to hardware failures. Computer forensics has
transformed the way digital evidence is gathered and as evidence of a crime and
makes use of sophisticated techniques and technologies. A computer forensic
expert uses these techniques to find evidence of an electronic device for
storing a possible crime. Computer forensics can be used to detect scam,
illegal use of a computer, a violation of company policies, inadequate record
keeping, email monitoring, chat history, files, tapes, people browsing sites or
any other form of electronic communications. Data can be any type of
electronic device like Pen drives, discs, tapes, handhelds, PDAs, memory cards,
emails, logs, hidden or deleted files, etc. Here we will discuss the basic
commands to get started on computer forensics. Let us start...
1) Date and Time:
One of the first pieces of information you want to
collect when you’re investigating an incident is the system date and time. This
will give a great deal of context to the information collected later in the
investigation, and will assist in developing an accurate timeline of events
that have occurred on the system.
2)
Systeminfo.exe:
The native systeminfo.exe command allows
you to create a system profile that includes Original install date, system boot time, host name, registered owner, OS
name, total physical memory, and hotfixes.
3)
Wmic bios get
name, serialnumber, version:
WMIC
expands Windows Management Instrumentation
Command-line, which uses the power
of Windows Management Instrumentation (WMI) to enable the System Management
from the command line. It can be used in Command Prompt on Windows without installing any
additional third-party software components. It will show the bios name, serial
number, and version.
4)
Wmic csproduct get name,
identifyingnumber, uuid:
It will explore the computer product
information like computer name, Identifying number or serial number, and
Universally Unique Identification Number (uuid).
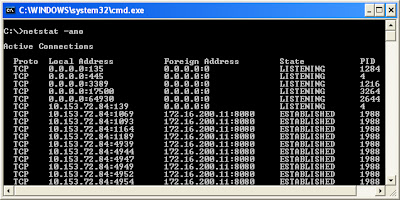
5) Netstat –ano:
This command
will show TCP and UDP network connections, listening ports, and identifiers of
the processes (PIDs) using those network connections.
6) Netstat –r:
This command will displays the kernel routing table in the
way we have been doing with route, another command ‘route print’ also display the
same.
7) Tasklist /v:
The tasklist
command does provide options for output formatting, with choices between table,
CSV, and list formats. The /v verbose switch provides the most information
about the listed processes, including the image name, PID, name and number of
the session for the process, the status of the process, the user name of the
context in which the process runs, and the title of the window, if the process
has a GUI. An investigator can also use the /svc switch to list the service
information for each process.
8) Net users:
This command will shows user names and user group of the local and remote account.
9) Net share:
Net
share displays information about all of the resources that are shared on the
local computer. When you display all of the shared resources on a computer, the
share name of the resource, the device names or path associated with the
resource, and a descriptive comment about the resource is displayed.


No comments:
Post a Comment